Why understand before using it
Nmap is the most widely used network scanning tool in the world, both by pentesters and system administrators. It is powerful, precise, and can reveal an impressive amount of information about a target.
The classic trap: using Nmap like a black box. You type a command, information appears, and you move on without knowing:
- what Nmap actually sent on the network,
- why a port appears open/closed/filtered,
- which limitations influence the result (filtering, NAT, segmentation, security policies),
- how to document a scan so it is defensible in a report.
This lesson follows the reverse path: understand first, then scan.
Nmap is not just “a command”: it is a workflow that turns network signals into next steps.
What a port really is
A machine can run multiple services at the same time: web, SSH, database, mail, etc.
For the system to know which service should receive an incoming packet, each service listens on a port number.
- A port is a logical identifier between 0 and 65535
- The port is part of the TCP/UDP header
- The operating system forwards the packet to the process listening on that port
Common examples:
- HTTP : 80
- HTTPS : 443
- SSH : 22
- MySQL : 3306
What matters to a tester is: which ports are reachable and which services are running behind them.
Port = logical identifier (0–65535) used to target a service.
The three port states in Nmap
When Nmap probes a port, it can conclude (simplified):
- Open: a service responds and accepts traffic.
- Closed: the machine responds, but no service is listening on that port.
- Filtered: a network filter (firewall/ACL/IPS/routing) prevents Nmap from clearly observing the state.
Why “filtered” matters:
- it does not mean “secure”
- it often means “not observable from your position”
- it must be explained in your notes/report
Open, Closed, Filtered are the fundamental states to interpret.
TCP: the three-way handshake
To understand a TCP scan, you need to know the handshake:
- SYN: “I want to connect”
- SYN-ACK: “ok”
- ACK: “confirmed, connection established”
A TCP scan is essentially about triggering network responses that let you infer the state of a port.
Nmap is not magic: it observes responses to probes. The quality of your analysis depends on your interpretation.
Installation and verification
On Kali Linux, Nmap is usually already installed.
If you are on Debian/Ubuntu (in an authorized lab):
Scope and rules before scanning
In a lab, scan your target VM. In a real environment: scan only if you have explicit authorization (scope, testing window, contacts, constraints).
Before your first command, note:
- authorized IP(s)
- test objectives (inventory? exposure? versions?)
- testing window
- impact constraints (fragile production, maintenance, etc.)
Step 1 — Host discovery (inventory)
Goal: identify “who is present” on the authorized segment.
-sn= host discovery without port scanning/24= address range (adapt to your lab)
Important: some topologies or policies can limit visibility. If a result looks inconsistent, document the limitation instead of jumping to conclusions.
-sn = “host discovery only”.
Step 2 — Port scan (exposed surface)
Once a target is identified, scan its ports to map the exposed surface.
By default, Nmap tests a set of commonly used TCP ports. This is often enough for an initial pass in a lab.
What you should write in your notes:
- target IP
- open ports discovered
- reasonable hypotheses (“SSH + web + exposed database”)
- next steps (version detection)
Step 3 — Version detection (enumeration)
Once open ports are identified, determine which software is running and which version.
Why this is central:
- a version lets you do documented research (vendor advisories, CVEs, release notes)
- but a version does not mean “automatically vulnerable”
- you must correlate with configuration, exposure, and context
-sV = version detection.
Save your results (traceability)
In pentesting, results must be preserved to:
- make findings reproducible
- feed the report
- prove your methodology
-oN = human-readable output file.
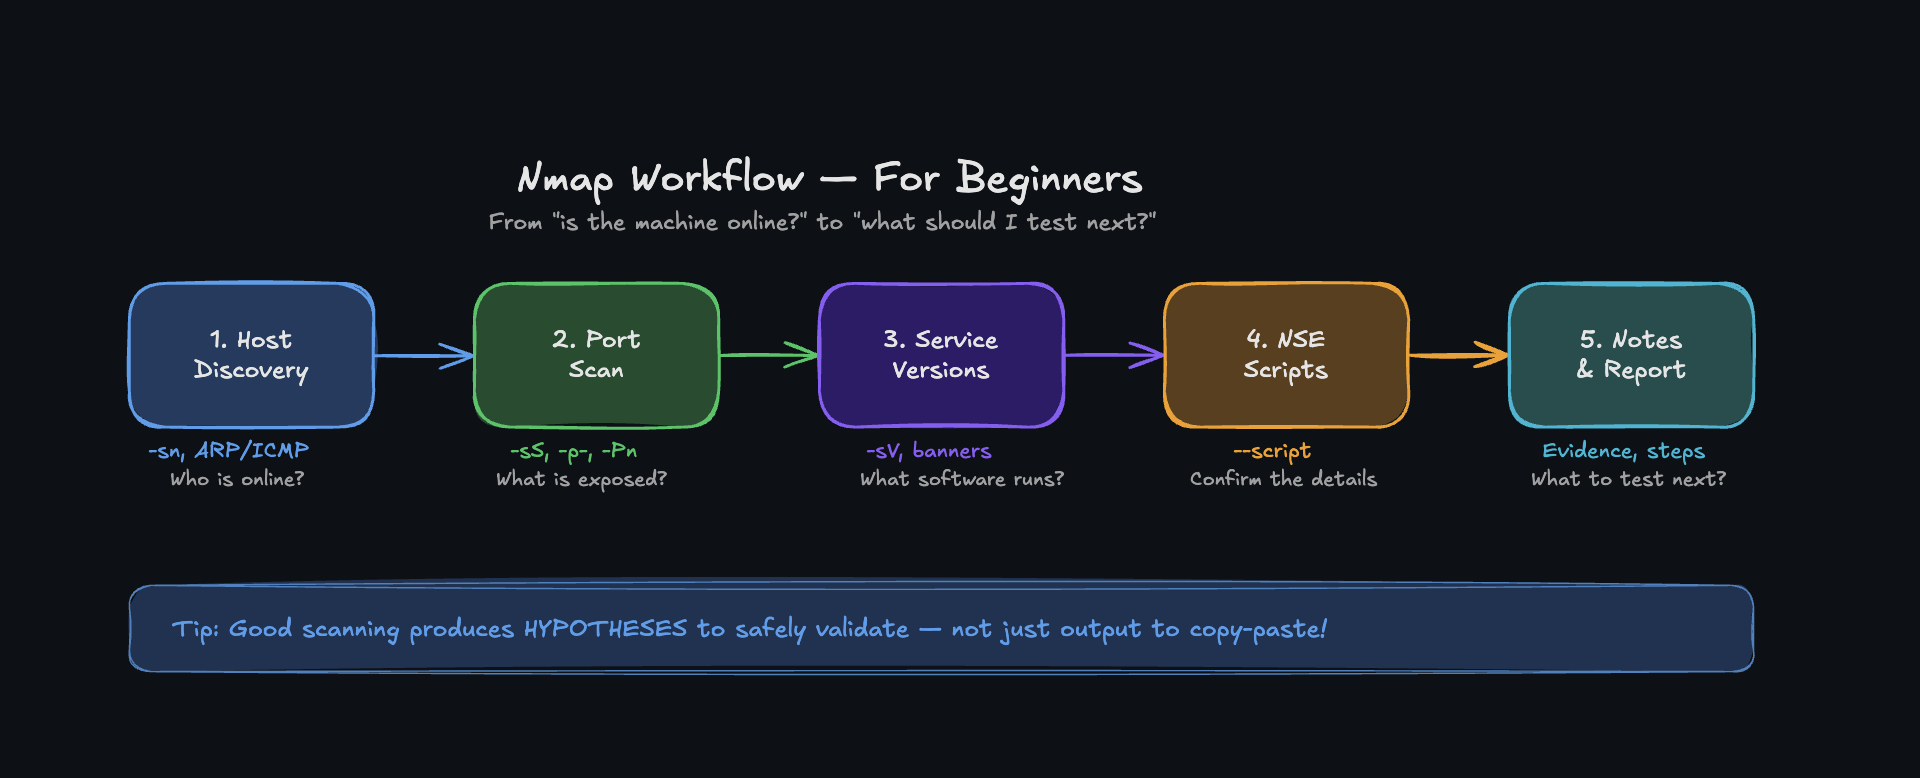
Recommended minimal workflow (simple and clean)
In an authorized lab, keep a clear workflow:
- Host discovery (inventory)
- Port scan (surface)
- Version detection (enumeration)
- Notes / log (what you did, what you concluded, what you test next)
The difference between “using Nmap” and “doing a professional scan”: method and documentation.
What Nmap does not do (and what you should not conclude)
- Nmap does not claim “vulnerable”: it observes signals.
- Results are relative to your network position.
- Filtering, segmentation, proxies, NAT, and IPS can change what you see.
A good report mentions:
- what was observed
- what could not be observed
- why (reasonable hypothesis + known limitation)
- and what that implies for risk
| Goal | Command | Expected output |
|---|---|---|
| Check Nmap | nmap --version | Nmap version |
| Host discovery | nmap -sn 192.168.1.0/24 | List of hosts that are up |
| Port scan (basic) | nmap 192.168.1.47 | Open/closed/filtered ports |
| Version detection | nmap -sV 192.168.1.47 | Service + version per port |
| Save scan output | nmap -sV 192.168.1.47 -oN scan.txt | Readable text file |
What is a network port?
Exercise 1
In your lab, perform host discovery on your authorized subnet, then choose an active target and list its open ports.
Exercise 2
Run version detection on open ports and write 5 lines of notes: “what I observed” + “what it implies” + “next step”.
Next Lesson
Now that you can map an exposed surface and enumerate it properly, the next lesson explores stealth and advanced scanning techniques: how to avoid detection, understand firewall filtering, and interpret ambiguous responses. Learn the Nmap flags that separate a loud scan from a silent reconnaissance.